Creating a dissolve screen transition using Three Shading Language
I stumbled upon the Buttermax website when looking through the inspiration channel in Bruno Simon's Three.js Journey Discord. When navigating between pages on the site, you are presented with a smooth transition, flying towards what seemed like a flat page where it then melts away revealing the new page underneath.
I was in awe at how this felt, and wanted to work out how they achieved this! That's when I thought I would try and being a bit like one of my favourite creators Hyperplexed and recreate this dissolve screen transition effect for myself.
Breaking it down
The first thing I wanted to do when trying to recreate an effect like this was to understand how the site is constructed. I knew it used 3D, but was everything within the canvas? Or was there mixed approach, with some of the animation applying DOM elements.
Having a poke around using Chrome DevTools, I could see that all of the content is contained within a <canvas> element. Good news, as it means we can focus entirely on Three.js code.
An interesting aside, is that there was a <main> element with children, but all of these had the CSS property visibility: hidden. I'm assuming this is to make the 3D content accessible to screen readers. Cool! Accessibilty in 3D is an area I definitely want to explore of.
Now that I knew I was going to tackle everything in Three.js, I wanted to try work out the individual layers which made the effect as a whole. For this I took a screen recording of the animation and stepped through frame-by-frame to get a detailed look at everything happening in that second. From what I could make out, I felt that the transition was primarily made up of three main layered effects:
- A full-screen dissolve effect transitioning between two scenes
- A camera movement for each scene, moving towards the content
- A chromatic abberation effect only applying to the scene we are leaving
In the rest of this blog, I will refer to the scene we are leaving as Scene 1 and the scene we are going to as Scene 2.
Now that we have established what we want, we can jump into recreating our first effect.
The fullscreen dissolve shader
Screen transitions in Three.js typically use a fullscreen shader to manage blending one scene render into another. The Three.js WebGPU screen transition example is a great demonstration of this, and is the starting point I used for my code.
When creating a screen transition, my preference is to work with a time variable t in the range [0,1]. Where at t=0 only scene one is displayed, at t=1 only scene two is displayed, and for all t values inbetween have some blend of the two scenes.
To achieve this, we can first create a full-screen shader using Three Shading Language (TSL) which takes a uniform variable t. For now, this shader should output the colour black for every pixel when t=0, and output white for every pixel at t=1.
A simple version of one of these shaders is using a smoothstep to create vertical division between black and white regions that moves across the screen with time t.
We can then easily turn this into a screen transition by returning a sampled pixel for scene one for any black pixel, and a sampled pixel from scene 2 for any white pixel. For now, any grey pixel will be a blend of the samples from each scene.
Below is this shader in action. Try modifying the t value using the slider, and also enable "Scene Sampling" to use the shader to transition between scenes.
Now we have a basic screen transition working, let's try make it match Buttermax's a little bit more!
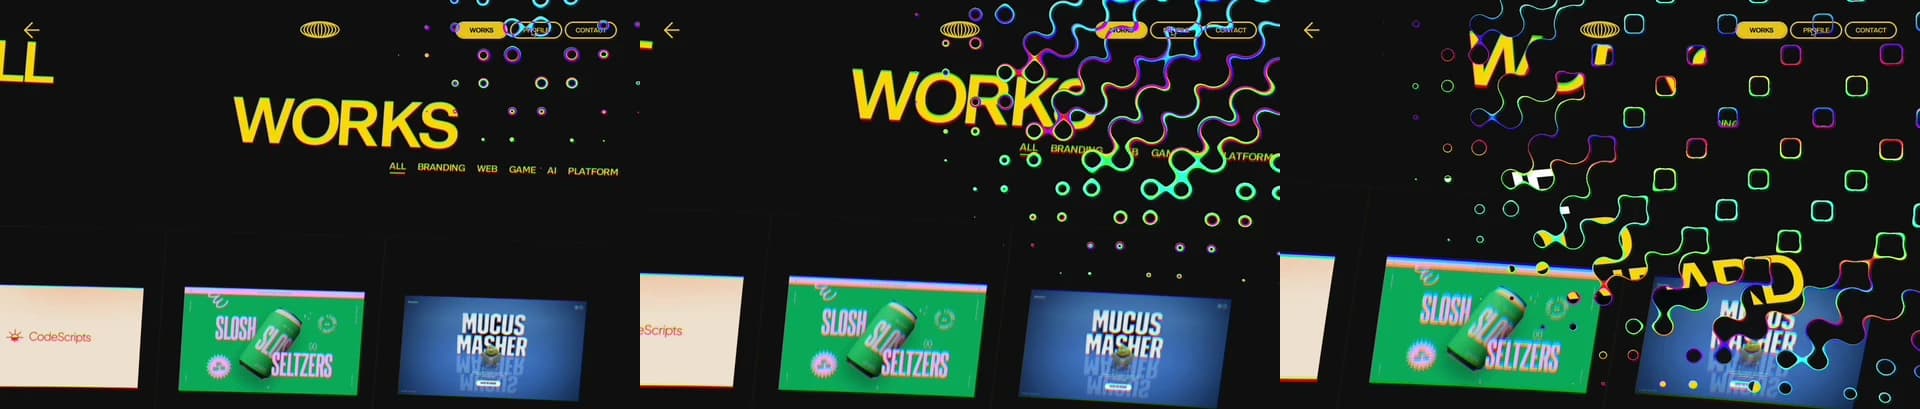
Their shader has a grid of small circles which grow and combine over time, spreading from the top right to the bottom left, with a rainbow effect on the edges of these circles.
Let's ignore the spreading and rainbow effects for now, and first focus on creating a grid of growing circles.
In shaders, one way to create circles is using a distance function from a point. If we subtract the distance from a positive value, this will create a radiating circle, with its radius determined by the size of the positive value. In our case, we want our circles to grow over time so this positive value needs to be some scalar of t.
We can then create a grid of circles by using a Loop function and summing together the values. When summing the values, we need to make sure we clamp them at 0 to ensure we don't end up with large negative values for our strength.
Below is the code for creating a grid of circles which grow with time t. As a note, we need to do some extra work with aspect ratio scaling, to ensure our circles don't turn into ovals when moving from a square [0,1]x[0,1] UV space to the rectangular canvas.
When looking again at Buttermax's transition, you can see they have diagonal rows of missing circles. We can achieve the same effect by skipping over third circle using the code below within our loop block:
Try this shader out with the demo below. You might notice that with the every third circle removed, the t=1 is no longer all white, but we will solve that issue later.
Great! Now that's done, we can add in the spreading effect from top-right to bottom-left. For this we will use a distance function again from the top-right point ((1,0) in UV space), and use that to change the time at which our circles grow across the screen.
To do this we want to subtract the distance from the strength of the circles, like so:
To break up the uniformity of this, we can also include some randomness using mx_noise_float by adding a random value to the distance we are subtracting.
As the noise we are adding is Perlin noise based on the UV position of the pixel and t, the random variation in the circle sizes is smooth and natural looking.
Now for the adding the rainbow banding effect. For this we can take any of the grey pixels and map these to a random colour value. In the code below, I assign a pixel to be part of the rainbow band if the value of the strength variable is between 0.1 and 0.9.
To determine these colour values we can use the TSL function mx_hsvtorgb to define fully saturated colour by hue. As we want the colours to vary randomly but smoothly we can again use the Perlin noise function, mx_noise_float, with the pixel's UV position to determine the value of the hue.
This gives us a smooth rainbow gradient, but colour is static with the pixels position. To give it some life we can offset the hue using strength to make the colours change as dissolve effect grows.
Looking back at Buttermax's example, we can also see that the width of the rainbow bands decreases over time. We can match this behaviour by decreasing the range of strengths in which we assign the rainbow colour to with respect to time t.
That now looks somewhat close to the effect we are after! Let's move on to the camera effects.
Synchronised camera movements
Going back at Buttermax's implementation, we can now focus on how each camera moves in the scenes with respect to time t.
I defined the staticPosition to be the position the scene camera is in before and after the transition. This is a static position where all the pages content is visible and is the same in both scenes.
If I were to describe the camera motion, I would say in the first scene the camera starts with t=0 at the staticPosition. It moves towards the content with a slight upwards rotation, and continues as if the camera was about to pass through the page. In the second scene, the camera starts further from the staticPosition and swoops in coming to rest at the staticPosition at t=1.
In our code, we achieve this effect by defining some positions and rotations for the camera to start/finish at:
And then we can define functions which take in t update the position and rotation of the camera using the lerpVectors method:
To smooth out the motion of the camera, we can apply an easing function to t. The site easings.net has a collection of easing functions to choose from including the Javascript code which we can use.
Comparing against Buttermax's implementation again, we can see that the dissolve effect only happens in the central third of entire animations timeline. As our screen transition shader code takes in a parameter which ranges from 0 to 1, we can reparameterise t to make a new parameter tShader which transitions during the central third of the entire animation.
We are definitely getting close to being finished now! Final step is adding some chromatic abberation.
Adding chromatic abberation
Buttermax's transition includes a subtle chromatic abberation effect which applies to the outgoing scene, in our case scene1, which strengthens as time increases. It's difficult to see but it makes a difference!
To add a chromatic abberation effect to our transition, we can update our shader code to first recolour the of pixel of Scene 1 before we sample it.
To do this, we first want to grab other samples of the Scene 1 at slightly different UV offsets. For this, I will create an offsetDirection vector, and three different offset values for each of the primary colours.
Using these samples, we then adjust the colour of the original Scene 1 sample by adding the primary colour component of each offset sample.
To scale this chromatic abberation effect with time, we can multiply the colour component we are adding by t.
This will give us the scaling colour fringing effect we want along the edges of objects in Scene 1.
Outro
Now if we combine it all together, we have a pretty good recreation Buttermax's amazing page transition effect. If you haven't already, I would recommend having a look around their website and see what else you may be inspired by!
Full code for the completed transition can be found on my Github.
I really hope you enjoyed recreating this effect with me. This is my first blog and I have thoroughly enjoyed making it.
If you have any feedback, or want to suggest something for me to look at next time, feel free to drop me a message at tom@madewithdove.co.uk
Made by Tom ![]()